Camera set-up for stop-motion
In class, we learned how to set up a tripod. To ensure the tripod is balanced, check the spirit levels built into the tripod at various locations. The Bulls-eye level at the top of the tripod legs must be balanced to ensure the camera is steady, and the horizontal spirit levels around the point where the camera is affixed should also be balanced to ensure the camera is level. There is a vertical spirit level that acts in a similar manner to a plumb-bob, that only is used when the camera is pointing down. The camera can be moved or rotated for panning shots by loosening an pulling out the carious handles (do not just turn the camera by grabbing it, you may unscrew it from the tripod instead, like I nearly did in class).
Bulls-eye level. Image source: Wikipedia commons

A horizontal spirit level. Image source: Wikipedia Commons
To attach the camera, on top of the tripod, there is a lever, a catch and a plate with a screw-like apparatus on it. The plate with the screw can be removed by pushing the catch down to move the lever out of the way (the back end of the lever holds the plate in place). The plate has a handle on the opposing side of the screw, which is inserted into the bottom of the camera (make sure the camera battery is inserted first). Screw the plate to the bottom of the camera making sure the lens direction of the camera matches the notation on the plate, fold down the handle and place on the tripod by using the lever and catch system.
We learned about the different settings on D-90 cameras to help with filming stop motion. The ISO should be low to reduce noise for stop motion animating. There is a balance between F-stop (camera aperture size), shutter speed (how long it takes for the camera to take a picture) and depth of field (how much distance within the shot is in focus).
To achieve these effects, turn the camera on and set everything to manual (the switches on the side and the dial on the top should be set to 'M'). The ISO can be found on a button on the front of the camera and can be tampered by using the front dial, on the opposite side of the lens. The aperture size and the shutter speed can be modified by selecting the 'Info' button on the front to display the information on the screen at the top of the camera to the front facing screen, and using the dials at the front and back of the camera.
When the information is displayed on the front facing screen, a scale appears which measures exposure. When a picture is over-exposed, the image is too bright; when it is under-exposed, it is too dark. It is best to get the point on the scale to zero, which can be achieved by tampering with the shutter speed or the aperture size. Changing the shutter speed and the aperture size relative to each other while keeping the picture neither under- or over-exposed changes the depth of field.
A small aperture size coupled with a short shutter speed results in a very dark image because not much light can enter the camera in the time it takes to take a picture. Small apertures capture a lot of detail at the cost of brightness, such as the pin-hole lens seen in the Nautilus eye below [third graphic in the image].
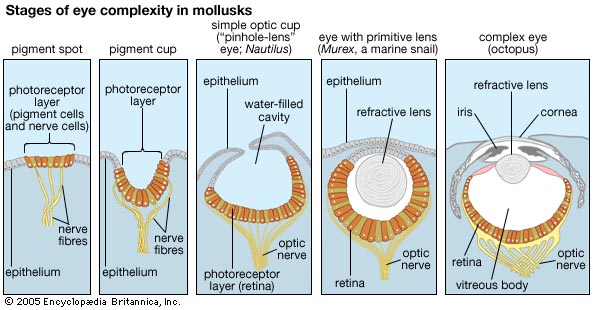
Image source: http://archives.evergreen.edu/webpages/curricular/2011-2012/m2o1112/web/cephalopods.html
A long shutter speed can be coupled with a wide aperture when there are relatively dim lights and dark scenery. This camera setup is very sensitive to any light in the area and is good for capturing the night sky as seen below.

Image source: https://www.davemorrowphotography.com/p/tutorial-shooting-night-sky.html
In the image source, the photographer Dave Morrow gives a tutorial describing the camera settings he used to capture images such as this one.
No comments:
Post a Comment